
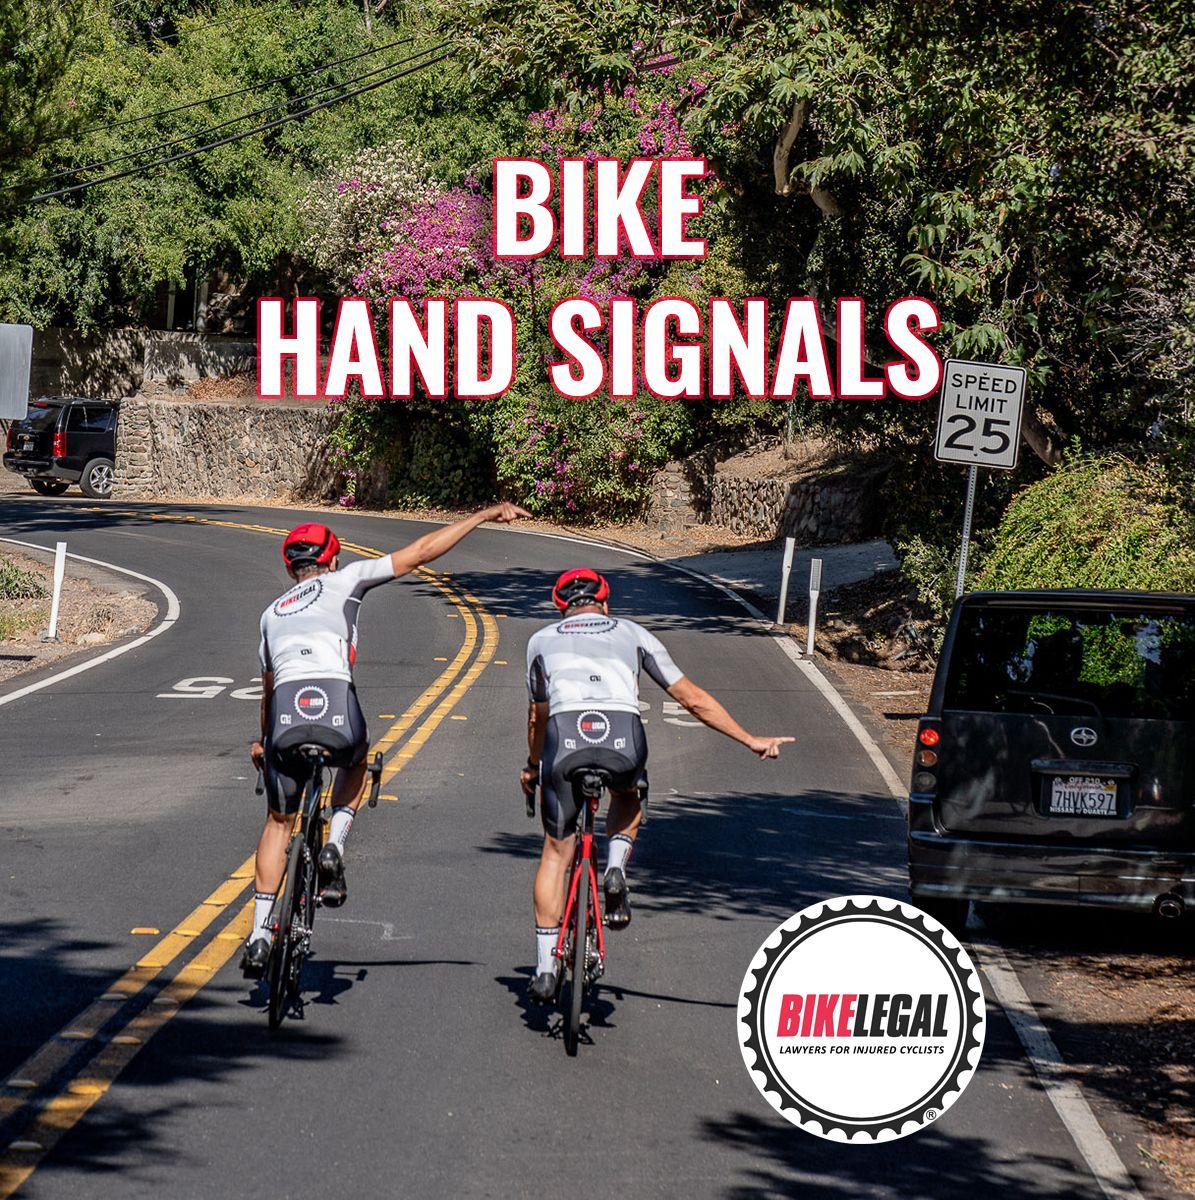
11 Hand Signals Every Cyclist Must Know on the Road
Follow us on
social media!
11 Hand Signals Every Cyclist Must Know on the Road
Experiencing a vehicle abruptly veering into another lane or making a turn without signaling is all too common, often eliciting a frustrated "Use Your Blinker!" exclamation from the following driver, usually peppered with colorful language. Similarly, frustration mounts when trailing a cyclist who neglects to communicate their intended direction shifts. This lack of signaling isn't just annoying; it poses a significant safety hazard.
On a bike, your hands are your primary means of communication, serving as both signals and words to those around you. But how well-versed are you in this crucial communicative gesture? Let's delve into the realm of bicycle hand signals, outlining the top eleven gestures that enable cyclists to convey their intentions clearly.
In this article, we'll cover:
- The top 11 bike hand signals every cyclist should know
- The hidden meanings behind each gesture
- How these signals can prevent mishaps and misunderstandings
- Navigating the nuances of signaling in a group
- Quick tips to ensure your signals are seen and understood
What Are Bicycle Hand Signals?
Bicycle hand signals are essential visual cues used by cyclists to communicate their intentions to other road users, enhancing safety and coordination. These signals indicate turning left or right, stopping, and slowing down. While universally recognized, the specifics can vary by region, hinting at the importance of familiarizing oneself with local cycling rules.
Understanding and using these signals properly is crucial for navigating roads safely and effectively, indicating there's more to explore about their application and nuances.
Why Bike Hand Signals Are So Important
- Safety First
- Stats from the National Highway Traffic Safety Administration (NHTSA) highlight the risks: 966 bicyclists were killed in 2021 in the U.S. due to traffic crashes.
- Hand signals serve as a primary defense mechanism, reducing collision risks by making cyclists' actions predictable.
- The Law Requires It
- Signaling is a legal requirement in many areas, akin to the obligations drivers have to indicate turns and stops.
- Non-compliance can endanger others and lead to fines.
- Enhances Road Harmony
- Effective communication via clear signals promotes respect and understanding among road users, reducing frustration and confusion.
- Pro Tip: Signal at least 100 feet before turning or stopping for optimal effectiveness.
- Bike Legal's Perspective
- Many accidents result from communication failures. Expertise in cycling law reveals that proper signaling is often what separates a safe journey from a court case.
- Bike Legal emphasizes the importance of hand signals in cyclist education and safety programs to prevent accidents.
This video provided by the League of American Bicyclists is a great visual of hand signals and scanning in use.
11 Most Used Bike Hand Signals
Cycling is about freedom and fluidity. But with this freedom comes the responsibility of clear communication, especially in the bustling urban traffic. That's where bike hand signals, the unspoken language of cyclists, play a pivotal role.
Let's break down the essential gestures that keep this two-wheeled harmony in tune. Here's a rundown of the 10 essential hand signals every cyclist should have in their repertoire:
The Basic Bike Hand Signals
- Left Turn: Extend your left arm out horizontally. It's straightforward and universally understood, like turning on your blinker.

2. Right Turn (Option 1): Stick your right arm out horizontally with your hand flat. It mirrors the left turn signals' simplicity and is clear to all road users.
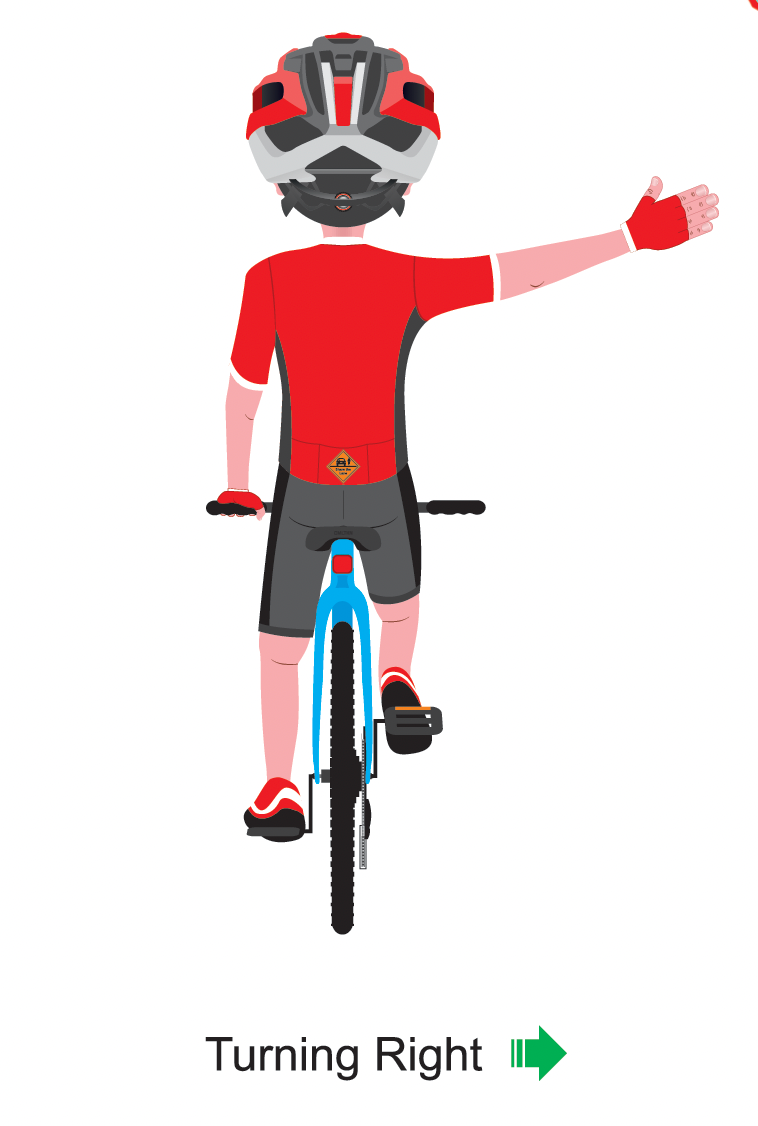
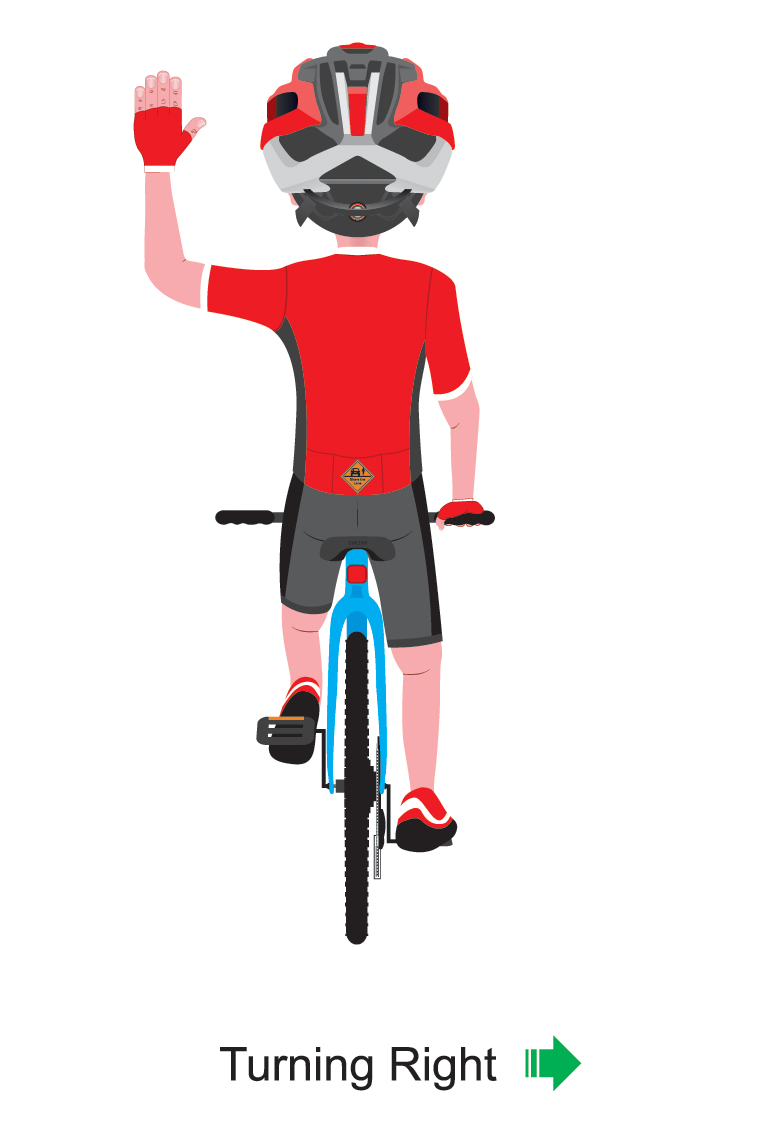
3. Right Turn (Option 2): Lift your left arm, bending at the elbow to form a 90-degree angle upwards. Traditional, yet effective.
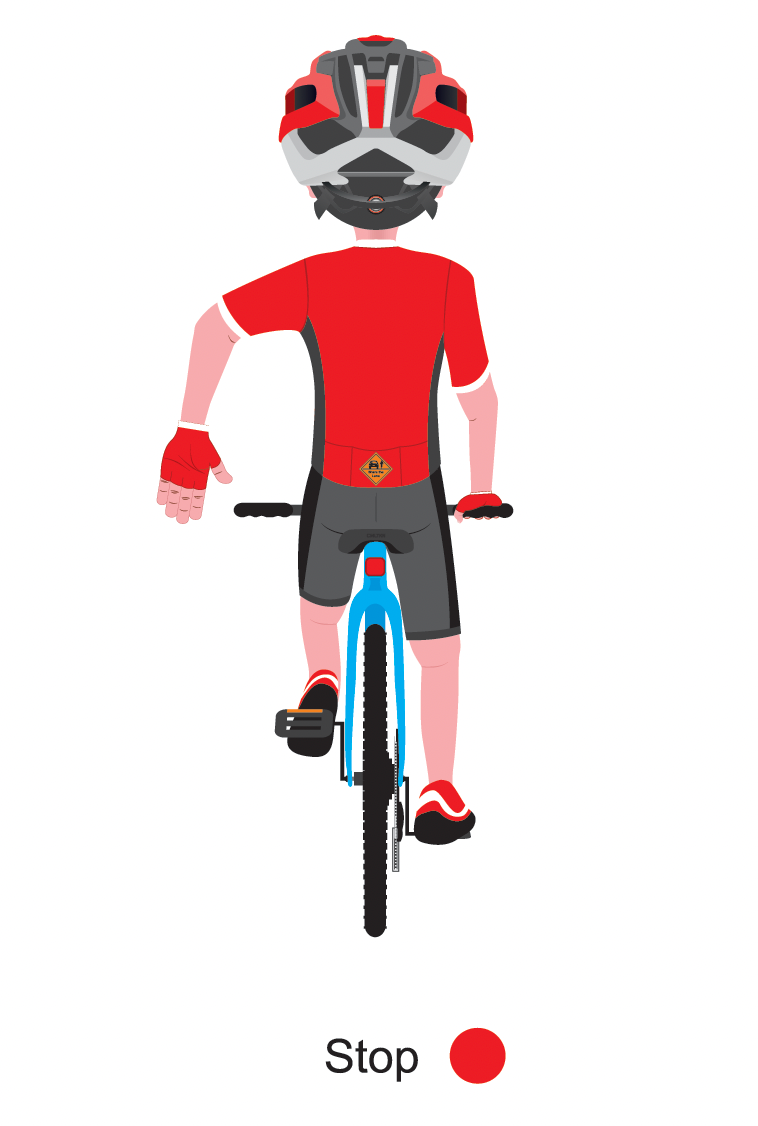
4. Stopping/Slowing Down: Drop your left arm, bending at the elbow, palm facing behind you. Think of it as hitting the brakes, visually.
Signals for Clarity and Safety
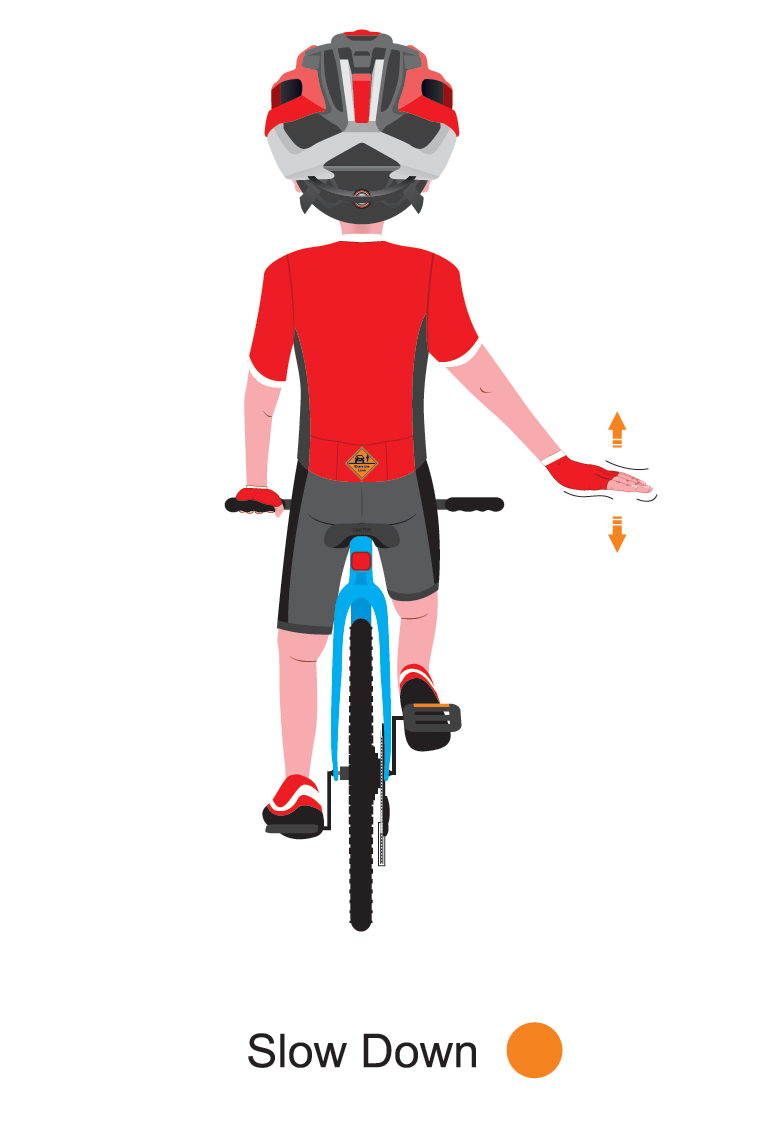
5. Slowing (Alternate): Extend your left or right arm out and down, with your palm facing the ground, and wave it slightly. This signals a slowdown in traffic or group rides.
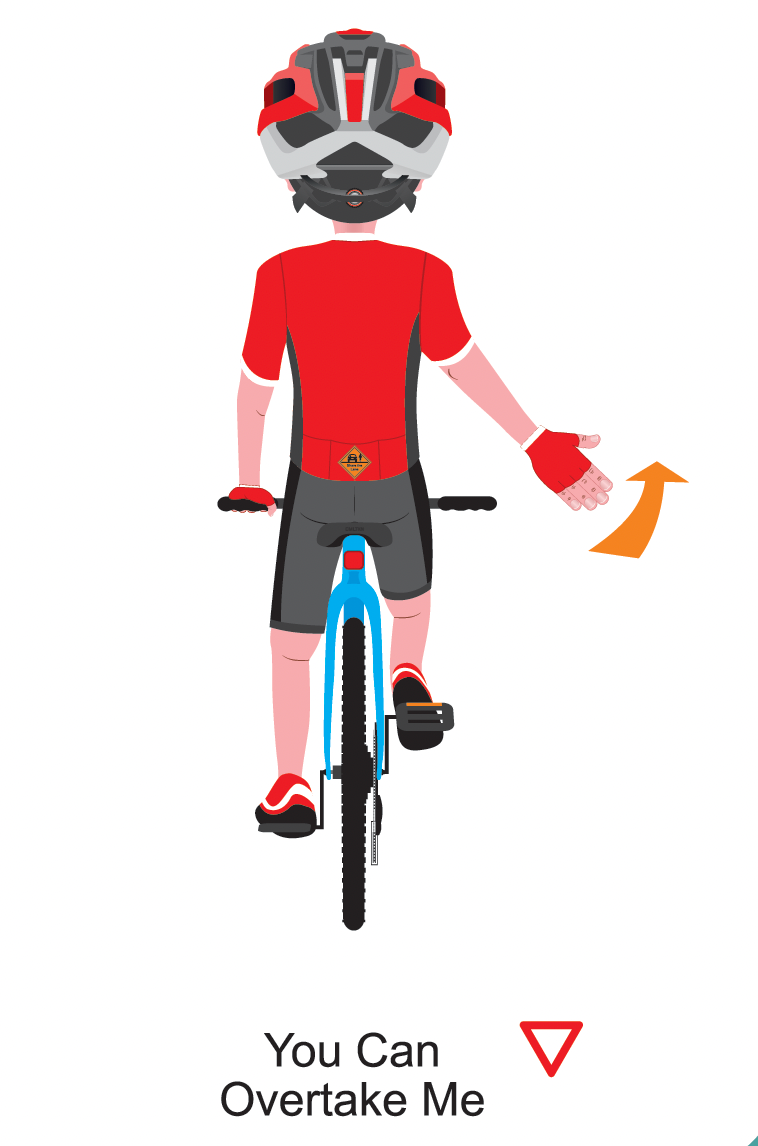
6. You Can Overtake Me: Lower your arm and motion you hand forward. This signals the driver or cyclist behind you to overtake and move in front of you.
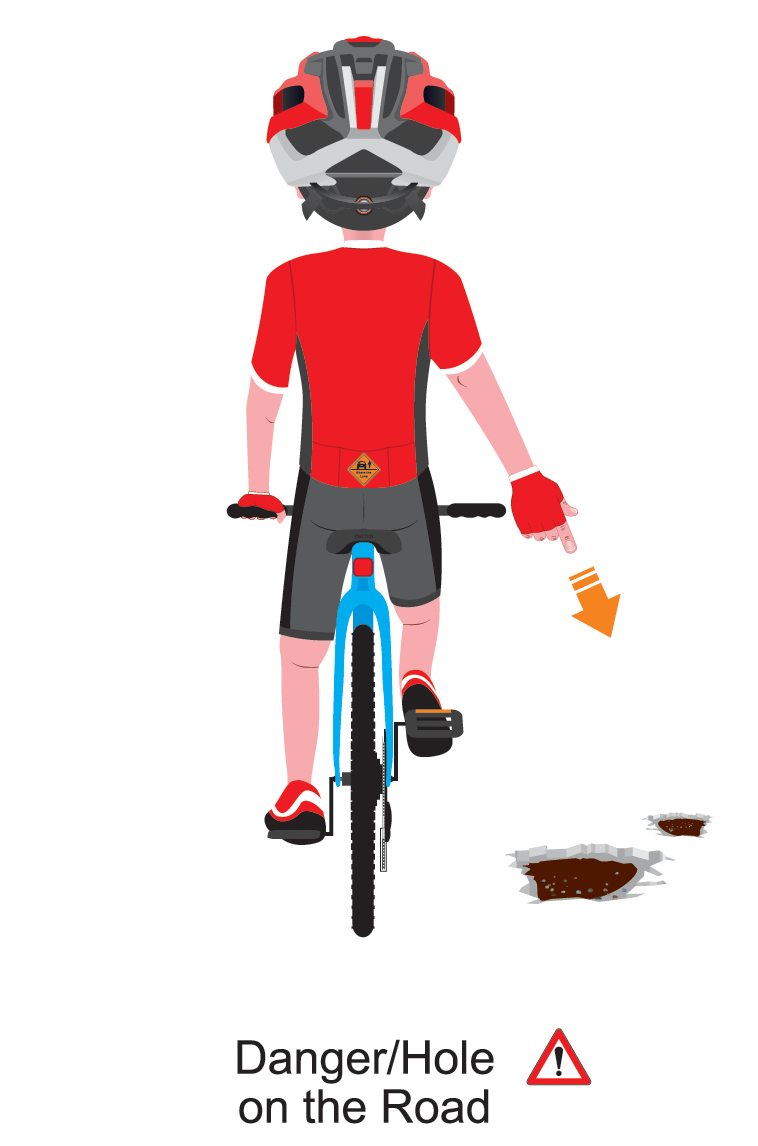
7. Hazard in the Road: Point down toward the hazard. This highlights obstacles like potholes or debris to those behind you.
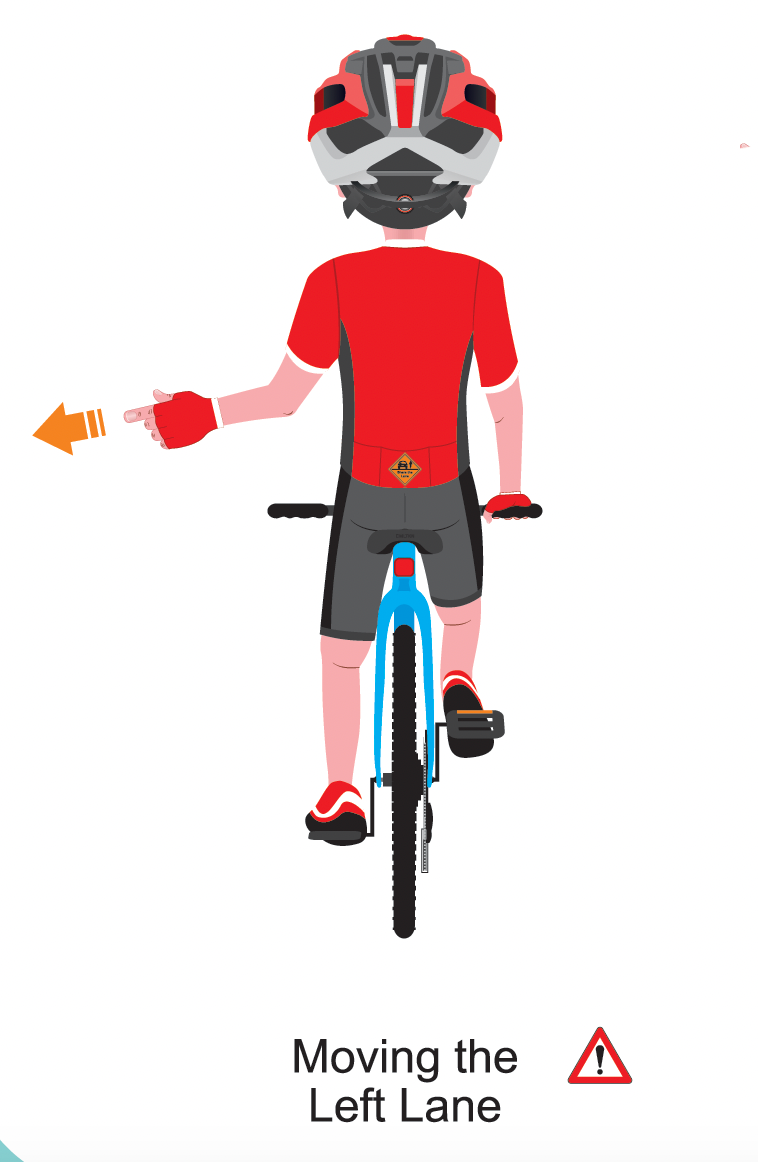
8. Taking the Lane: Extend your left arm out and slightly back, indicating you're moving into or changing lanes and taking a left turn. Essential for city cycling.
Advanced Communication
9. Group Stop: Raise your hand high with your palm facing forward. It's a clear signal for group rides that a stop is imminent.
10. Turning Indication for Group Rides: When leading a group ride and planning to make a turn, pointing in the direction of the turn (left or right) before reaching the intersection can help prepare the group. This is slightly different from the individual right or left turn signals as it's used to signal the intention well in advance, ensuring the group stays together and prepares for the turn.
11. Thanking or Acknowledging: A simple thumbs up or a wave can go a long way in acknowledging a motorist's courtesy or signaling a pedestrian.
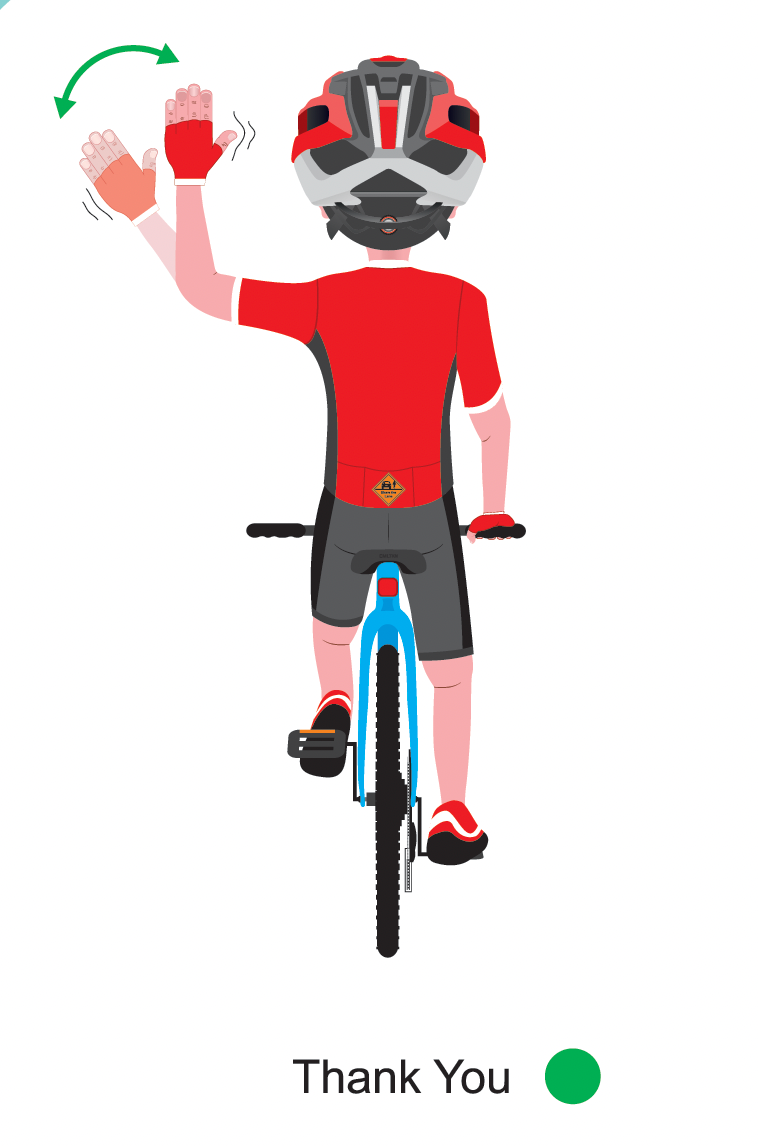
Incorporating Bike Legal's Insight: We stress the importance of these signals not just for safety but also for legal protection. We've observed that many cycling incidents stem from communication breakdowns.
Our advocacy goes beyond the courtroom; we encourage education and awareness, empowering cyclists with the right cycling knowledge to make proper signals and navigate the streets safely and confidently.
Pro Tip: Consistency in your signals builds predictability, which in turn fosters a safer cycling environment. Practice these signals until they become second nature.
These 11 signals are more than just hand movements. They're your communication lifeline on the road. They convey your intentions, prevent misunderstandings, and ultimately keep you and others safe.
And remember, in the complex landscape of road interactions, Bike Legal is your ally. We understand the intricacies of cycling laws and are dedicated to promoting a culture of safety and respect on the roads. Whether you're signaling a left turn or navigating through legal complexities post-accident, our expertise is your resource for a smoother ride.
How to Use Bike Hand Signals Properly
Mastering bike hand signals is not just about knowing the gestures. It's about using them effectively. Proper signaling is a dance between timing, visibility, and clarity. Here’s a step-by-step guide to ensure your hand signals are as effective as they are intended to be.
- Plan Ahead - Before you even lift a hand off the handlebar, know your next move. Anticipate turns, stops, and lane changes well in advance. This foresight is key to timely and clear signaling.
- Check Your Surroundings: A glance over your shoulder and a turn signal serves a dual purpose. It informs you of the traffic situation and signals to others that you're about to make a move. This pre-signal awareness can be as critical as the signal itself.
- Signal Clearly and Confidently: When you’re ready to signal, do it with conviction. Extend your left arm straight and fully, ensuring your hand is well away from your body. Your signal should be unmistakable to anyone sharing the road with you.
- Maintain the Signal: Hold your hand signal for at least three seconds before making your move. This duration ensures that those around you register your intentions. If you need to return your hand to the handlebar for control or braking, ensure you've given enough notice for others to react.
- Ensure Visibility: Your signals need to be seen to be effective. Wear bright or reflective clothing, especially in low-light conditions. Make sure your signal isn't obscured by luggage, clothing, or body position.
- Confirm Acknowledgment: Whenever possible, make eye contact with drivers, other cyclists around, and pedestrians you’re communicating with. This non-verbal cue can reinforce your signal and ensure it’s been understood.
Bike Legal Firm advocates for these practices not just for safety but for legal clarity as well. In our experience, many disputes in cycling accidents revolve around whether the cyclist signaled appropriately. By following these steps, you not only safeguard yourself on the opposite side of the road but also protect your legal rights in the event of an accident.
And this is why we, at Bike Legal Firm, champion these principles, empowering cyclists with the knowledge and support they need to navigate the legal and physical aspects of cycling with confidence.
Tips for Effective Communication with Bike Hand Signals
Mastering hand signals is just the start. The real art lies in how you communicate these signals on the road. Here are some insider tips to ensure your hand signals are not just seen but understood and respected.
- Make Eye Contact: Locking eyes with drivers, cyclists, and pedestrians isn't just about acknowledgment. It's about connection. When you make eye contact, you humanize the interaction, making your signals more personal and harder to ignore. It's a silent nod that says, "I see you, and I'm making a move. Please see me too."
- Use Clear and Deliberate Movements: Half-hearted signals are as good as no signals. When you decide to signal, do it with purpose. Fully extend your arm, and make your gestures bold and unambiguous. Your clarity in signaling directly translates to clarity on the road.
- Be Predictable: Predictability is the cornerstone of road safety. Use standardized signals and use them consistently. When your actions on the road match the signals you give, you build trust with other drivers and road users. This predictability makes the road safer for everyone.
- Signal Early, But Not Too Early: Timing is everything. Signal too early, and you risk being forgotten. It's too late, and you might not give others enough time to react.
- The sweet spot? Signal about 100 feet before your turn or stop, maintaining the signal for about 3 seconds. This slow move gives others ample time to notice and adjust to your actions.
- Adjust to Your Environment: Different environments call for different approaches. Busy urban streets might require more emphatic signaling compared to a quiet neighborhood ride. Gauge your surroundings and adjust your signaling strength and frequency accordingly.
- Keep Your Signals Visible: Your signals can't communicate if they're not seen. Avoid signaling too close to your body or in a way that might be obscured by your bike or gear. And remember, visibility isn't just about your signals; it's also about you. Wear reflective gear or bright colors to ensure you're seen, especially during dawn, dusk, or night rides.
- Incorporate Brake Lights as a Safety Tool: While traditional hand signals are indispensable, integrating modern technology can enhance safety significantly. Consider the use of portable, attachable bike brake lights. These lights, similar to those on a car, can be a game-changer, especially during dusk, dawn, or nighttime rides.
- Practice, Practice, Practice: Like any skill, effective signaling comes with practice. Make signaling a habit, even on empty roads. The more you practice learning signals, the more intuitive it becomes, ensuring that when the moment comes, your signals are second nature.
- Educate Your Riding Companions: Spread the knowledge. If you ride in a group, ensure everyone is on the same page about signaling. Group rides are smoother and safer when everyone uses consistent stay safe, clear signals.
Signal Your Way to Safer Rides
It's clear that bike hand signals are more than mere gestures; they're your voice on the road. By using them effectively, you're not just ensuring your safety but also contributing to a safer environment for everyone on the road. Remember, clear communication is key to coexistence.
- Plan and check: Always know your next move and check your surroundings.
- Signal clearly: Use deliberate and visible gestures.
- Make eye contact: Connect with those around you.
- Be predictable and timely: Signal consistently and at the right time.
- Adjust to your environment: Tailor your signaling to the situation.
- Practice makes permanent: Incorporate signals into your daily ride so these actions become a permanent part of your cycling safety.
Navigating the roads with confidence comes down to more than just hand signals. When the unexpected happens, it's about having the right support in your corner.
Bike Legal Firm specializes in turning cycling mishaps into manageable situations. We're more than just legal experts; we're your road safety partners, ensuring that every ride, signaled or not, has a backup plan if you or a loved one is hurt.
Request a free consultation by calling 877-BIKE LEGAL (877 245-3534) or submitting a form.

Bike Legal Spoke & Law Blog

If a Driver Seriously Injures or Kills Someone, Are They Automatically Tested for Drugs and Alcohol?
California’s Landmark Electric Bicycle Safety Study Reveals Why Regulating E-Bikes Is So Complicated
Ride Protected
Ride Safe, with Bike Legal
At Bike Legal, our mission is to advocate for bicycle safety and to share the road responsibly through education. Our legal team is committed to supporting and representing cyclists across the United States, no matter where you ride or how you ride.